Deconstructing a Kubernetes Deployment
Deconstructing a Kubernetes Deployment
Think back to the first time you laid eyes on a Kubernetes deployment manifest. Did it make any sense to you apart from the image and container parameters? Wait, it did? Well, that makes one of us!
When I first saw a Kubernetes deployment, I was hit with a flurry of questions. Questions that made me feel like I had opened the Matrix. Now, after some much-needed experience (and a few existential crises), I think I can finally answer some of those burning questions.
|
|
Why is a Deployment Such a Nested Document?
Seriously, all I wanted to do was run an image! But instead, I got handed an onion with layers of YAML, where every layer seemed to unlock more mystery and confusion. Why the nesting? Well, Kubernetes has a thing for structure. Those layers aren’t just there to test your patience; they’re there to give Kubernetes all the context it needs to run, monitor, and scale your app like a pro.
To break it down: at the top level, you declare that it’s a “Deployment” (so Kubernetes knows you’re serious). Then you define your spec (what you actually want to happen), and finally, deep in the abyss, lies your container configuration. It’s all for good reason—honestly!
Breaking it Down:
-
Deployment: This top-level resource manages Pods by creating a ReplicaSet to ensure that the desired number of Pods is always running. It’s the boss, telling Kubernetes, “Hey, I need three Pods, make it happen and keep it that way.”
-
ReplicaSet Section:
- Replicas: This line (
replicas: 3) indicates how many Pods should be running at any given time. - Selector: The selector
matchLabelsmatches Pods with the labelapp: my-app. This is how the ReplicaSet knows which Pods to manage. If one dies, it spins up a new one. This is how it knows the difference between your dev and prod pods which can run in the same cluster and namespace. (if you are confused see the labels section below)
- Replicas: This line (
-
Pod Section:
- Pod Template: Nested deep inside the Deployment is the Pod template. The
templatesection defines the Pods that will be created and managed by the ReplicaSet. - Containers: Within the
specof the Pod, we define the containers. In this case, it’s a singlenginxcontainer running inside each Pod, withport 80exposed.
- Pod Template: Nested deep inside the Deployment is the Pod template. The
So, the Deployment controls the ReplicaSet, which controls the Pods. It’s like a well-orchestrated chain of command where each piece has a clear job to do. If one Pod goes down, the ReplicaSet ensures a new one is created to keep things running smoothly.
But is that all a deployment does? Control a Replica Set? In that case i can just go ahead and manage everything with a Replica Set without needing a Deployment? Well you can! But here are reasons you might not want to.
Running a Deployment on top of a ReplicaSet in Kubernetes is a common pattern because a Deployment provides additional management capabilities beyond what a ReplicaSet offers. Here are the key reasons why someone would use a Deployment over a ReplicaSet:
-
Declarative Updates: A Deployment allows declarative updates to applications. You define the desired state of your application (number of replicas, the image version, etc.), and the Deployment controller ensures that the actual state matches the desired state.
-
Rolling Updates: Deployments manage rolling updates seamlessly. They ensure that updates to your application happen gradually, with a controlled number of Pods updated at a time, reducing downtime and providing a rollback option in case of failures.
-
Rollback Support: Deployments keep track of versions (revisions) of ReplicaSets and allow rolling back to a previous version if something goes wrong during an update. This makes it easy to revert to a stable state.
-
Multiple ReplicaSets: During updates, Deployments can manage multiple ReplicaSets at the same time (e.g., when transitioning between versions of an application), ensuring smooth version transitions without manual intervention.
In short, the Deployment abstracts the complexity of managing ReplicaSets by providing lifecycle management, scaling, updates, and rollbacks, making it the preferred choice for most use cases.
What’s with Labels Everywhere?
Okay, let’s talk about labels—yes, those little key-value pairs you have to sprinkle all over the place like confetti, At first, you’re thinking, “Did I really need to specify this label here… and here… and, oh great, here too?” It feels like overkill.
But think of labels as your app’s name tag at a Kubernetes conference. Each resource in Kubernetes needs to find its friends (or at least its services and pods). Labels help Kubernetes match things up—kind of like speed dating but for resources. The Deployment, Service, and Pods all need to share a common label so they can discover each other and work together. No labels, no pod-to-service magic.
Example: Labels and Selectors in Action
Let’s talk about labels and selectors—Kubernetes’ way of organizing its party guests. Labels are like sticky name tags: “Hi, I’m app: my-app.” Selectors? Well, they’re the bouncers at the door, making sure only those with the right label get into the party (or in this case, get managed by services, deployments, etc.).
|
|
Now, let’s say you have a Service that’s standing there with its checklist, making sure only the cool kids (a.k.a Pods with app: my-app and environment: production) get the VIP treatment (traffic):
|
|
So, what’s happening here? The Service looks for Pods wearing the label app: my-app and environment: production, and boom—it routes traffic to them like a pro. Kubernetes is like, “I got you; traffic’s headed your way!”
Example Deployment YAML File
|
|
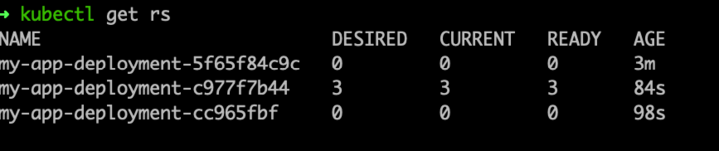
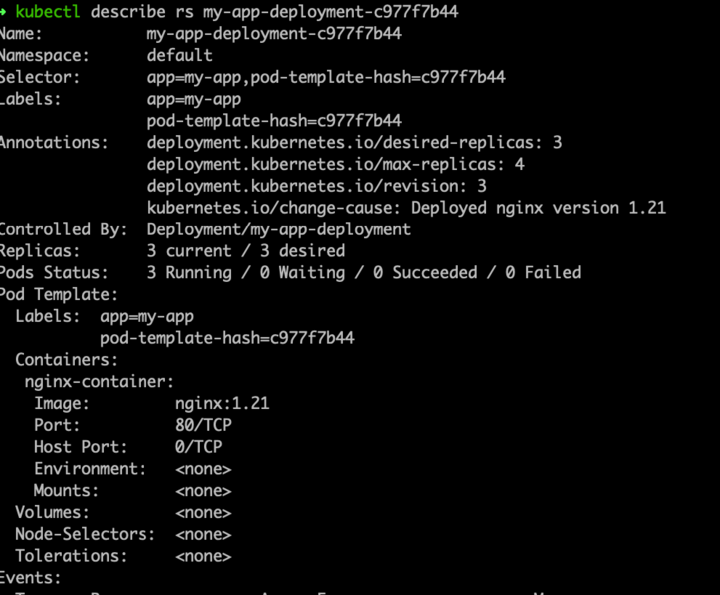
Why Are There Multiple ReplicaSets Associated with a Single Deployment?
Great question! You might notice that a single Deployment can have multiple ReplicaSets associated with it. But why?
When you update a Deployment (like changing the container image or resource limits), Kubernetes doesn’t just update the Pods in place. Instead, it creates a new ReplicaSet for the new version of the Pods. This allows Kubernetes to:
- Perform rolling updates: It gradually replaces old Pods managed by the previous ReplicaSet with new Pods managed by the new ReplicaSet.
- Rollback capability: The old ReplicaSet is kept around in case you need to roll back to a previous version.
Example:
- You deploy version
v1of your app, which creates ReplicaSet A. - You then update the Deployment to version
v2. Kubernetes creates ReplicaSet B. - If something goes wrong with version
v2, you can roll back to versionv1, and ReplicaSet A will take over again.
This versioning of ReplicaSets ensures smooth upgrades and quick recovery from issues.
How Do I Upgrade and Rollback via a Deployment?
Upgrades and rollbacks in Kubernetes are super easy and well-orchestrated. The Deployment is designed to handle this elegantly using rolling updates.
Upgrading a Deployment
Let’s say you want to update your app to a new version (say, from nginx:1.19 to nginx:1.20).
-
Modify the Deployment YAML: Update the image version in the deployment:
1 2 3containers: - name: nginx-container image: nginx:1.20 -
Apply the Updated Deployment: Run the following command to update your Deployment:
1kubectl apply -f deployment.yaml -
Watch the Rolling Update: Kubernetes will gradually terminate old Pods and create new ones using the updated ReplicaSet, ensuring no downtime (thanks to the
maxUnavailableandmaxSurgesettings).You can check the status of the rollout with:
1kubectl rollout status deployment my-app-deployment
Rolling Back a Deployment
If the new version (nginx:1.20) starts acting up, don’t worry! You can easily roll back to the previous stable version (nginx:1.19).
-
Rollback Command: Roll back the Deployment to the previous version by running:
1kubectl rollout undo deployment my-app-deploymentThis command will switch back to the old
ReplicaSet (with nginx:1.19) and start replacing the problematic Pods with the stable ones.
-
Check the Rollback Status: You can check the progress of the rollback:
1kubectl rollout status deployment my-app-deployment -
Specific Revision Rollback: If you have multiple versions, you can also roll back to a specific revision:
1kubectl rollout undo deployment my-app-deployment --to-revision=2
And just like that, you’ve rolled back to a stable version, with Kubernetes doing all the heavy lifting for you!
Demo Time !!
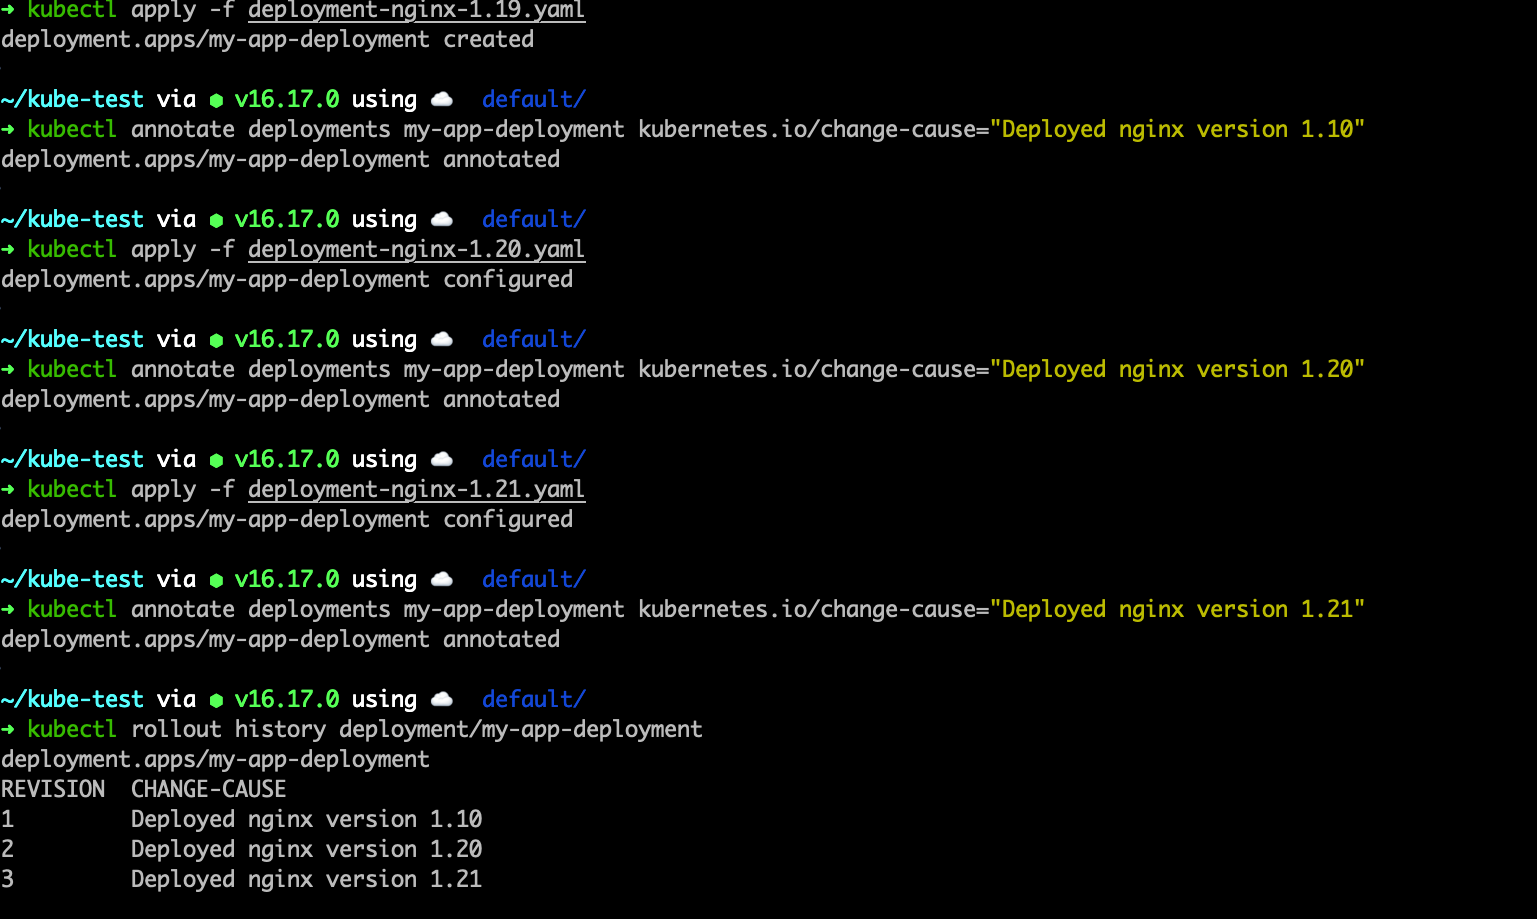
Deploying three versions of Nginx
Each deployed version will have its own replica set
Each replica set will manage a specific deployment revision
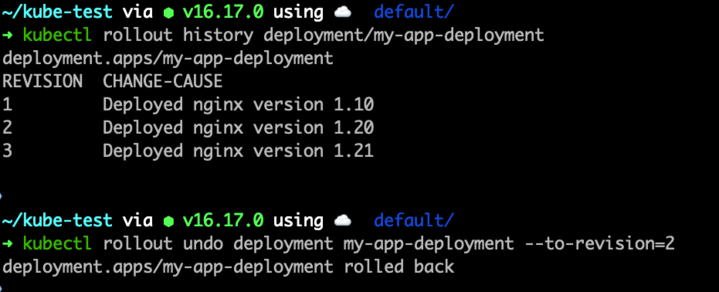
Rolling back the deployment to run a specific version
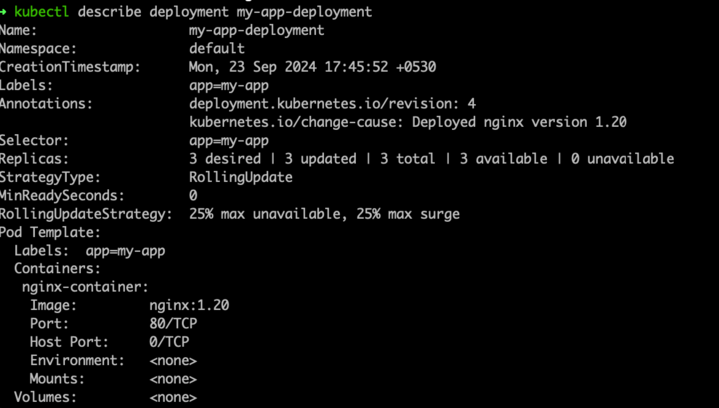
Deployment is now running the revision specificed
Final Thoughts
So there you have it. Labels and selectors are the glue that binds your Kubernetes resources together, and Deployments are the orchestrators, making sure your Pods are always running, scaling, and updating smoothly. When you understand how these pieces fit together, Kubernetes becomes less of a scary YAML monster and more of a well-oiled machine with you in the driver’s seat.